Showing posts with label Tutorial. Show all posts

11.18.2011

Swirly Girly T-Shirt Scarf Tutorial

Guess what? You made it to Friday! Whoop Whoop! That's definitely cause for celebration, and a fun tutorial! After letting my camera know who was boss, I'm here with pics and a fun tutorial on an incredibly fast, easy scarf that has endless possibilites.
I've been seeing these all over Pinterest and blogs, I've watched a video on how to make them, seen tons of tutorials, and just had to try it. Like the headband, I made this in a fit of craftiness at midnight before our big Ladies Conference. It took me no time at all. Literally about 10 minutes max.

So let's get started! What you'll need:
Old t-shirts (as many as you want), a large plate (or something round) and scissors. Yep, that's all! I used a 10" dinner plate. How wide the circumference is will determine how long your scarf strands are.
Start with your first shirt, and cut it off right under the arms.
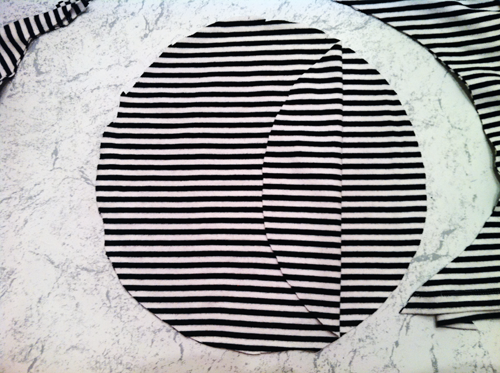
Use your plate as a guide to cut a circle out of the fabric. Leave the shirt intact so you can cut two pieces at one time.
Like so. Continue doing this until there is no more fabric. I was able to get 4 full circles out of my shirt (it was a 2XL) but ended up only using two. Each of these circles will become a strand in your scarf, so mix and match colors and use as many strands/circles as you want.
Start at one edge of the circle and begin cutting in a spiral. I made my strands about 2 inches wide.
Continue cutting until you have a cute fabric snake sitting on your table. :) At this point I left the center as a circle, but later went back and cut it to match the beginning of the strand.
Take each strand and stretch them out. Because they are cotton, they'll start curling into themselves and form a fun loopy swirl! A tip: This shirt I used happened to be stretchy, probably with something other than cotton in the material. It didn't want to curl too much, and ended up not swirling as much as the white pieces, which were used from a plain white t-shirt. Be sure to use cotton t-shirts for the best results.

Continue this process with your remaining shirts until you have the desired amount of strands. The fun thing about this scarf is that the possibilites are endless. You can mix and match colors, make some strands thick or some thin, and make just a few strands or a whole bunch of strands.
Once you have all the pieces you want, put them together and tie knots in them, or add your own embellishments! I've seen so many variations on these.

I've seen ones with pom-pom strands mixed in with the t-shirts, or fabric flowers clipped on. If you wanted to be really funky, you could use a smaller plate, and piece the ends together of different colors for a fun effect. Just knot two ends together until you reach the desired scarf length!
So there you go. A fun, swirly girly t-shirt scarf that takes less than 10 minutes to throw together. Looking at these pics, I think I'll go back and add a few black strands to mine to make it thicker. The more the better!

-Jenn (With 2 N's)

11.16.2011

Pearly White Headband Tutorial

It's been so long since I've made any hair pretties, that I'm, just beside myself to be able to share this with you! Life has been pretty hectic lately, and crafting has definitely been put on the back burner. If you could see my craft table, you'd probably faint from sheer horror.

It's no secret that I'm in love with Pinterest, so when I saw this Anthropologie inspired headband, I knew I had to make it. I pinned it about 2 months ago, bought the supplies about 2 weeks ago, and just this weekend got the chance to sit down and actually make it.
As I posted last week, this last weekend I was at our annual Ladies Conference. Friday morning was the first session, and after packing everything I needed Thursday night, I got the urge to create this headband so I could wear it the next day. It was literally 11:30 at night, and I was sitting at the dining room table hot gluing pearls to felt. It felt so good too. :)

So let's get to it! Things you'll need:
A headband, felt, pearls or beads, scissors and a hot glue gun.

I found these pre-strung pearls at Michaels, and opted for a plastic headband with teeth, since it seems to stick better on my head. I also found this awesome stiffened felt at Michaels. I was a goober and had it turned over in the picture, but the opposite side was slightly glittery. You won't see it once the pearls are on, but glitter never hurt anyone.

Measure out how many pearls you want. Mine were right at about 10" long, or approximately 55 pearls. I wanted smallish circles so I could put three on the headband.
Start by gluing down the first bead, on the knotted end. As I was doing this, I was holding the other end with my fingers so the pearls wouldn't fall off. If you decide to string them yourself, you can knot both ends. This would of course be easier, but I like to wait till midnight to do things. :)

Apply a generous portion of hot glue (don't skimp) and start gluing the pearls in a spiral.
You don't want glue seeping in between the pearls, but be sure to get enough glue or they won't stick to the felt. As you can see, I opted to do white pearls on white felt, but I also wanted my circles to be tight, so I made sure to push the pearls together on the strand and glue them close together.

Be sure when you start your circle that you will have plenty of space on the felt to complete it.
Repeat until you have the desired amount of circles. Even though the last pearl isn't knotted, the glue will keep it securely on the felt.
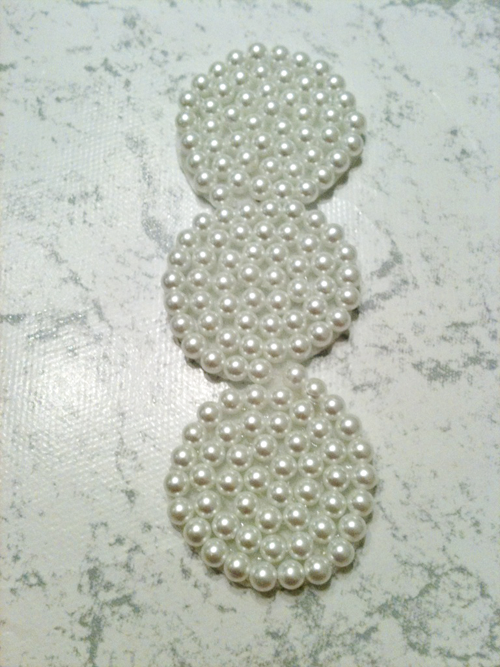
Cut out the circles, being sure to not leave felt on the edges, and space them together. I decided to make mine look like it was a continuous spiral. But really, you won't be able to tell when you get it on.
These tend to be heavy, so use plenty of glue when putting them on the headband. Normally when I get to this step I would glue an extra backing on the inside of the headband, but I wanted to preserve the gripper teeth, and they were sturdy enough because I used the stiff felt.
 And there you have it! An easy, pearly headband that will take you less than 30 minutes to make.
I got tons of compliments on this. It's probably my favorite headband I've made. The options for colors are endless, and it goes with anything. You could add a cute embellishment to the center, or use colored felt underneath. I picked up some black glittery pearls and gray felt to make one for my sister.

Tomorrow: Swirly Girly Scarf Tutorial

-Jenn (With 2 N's)