Showing posts with label DIY. Show all posts

11.18.2011

Swirly Girly T-Shirt Scarf Tutorial

Guess what? You made it to Friday! Whoop Whoop! That's definitely cause for celebration, and a fun tutorial! After letting my camera know who was boss, I'm here with pics and a fun tutorial on an incredibly fast, easy scarf that has endless possibilites.
I've been seeing these all over Pinterest and blogs, I've watched a video on how to make them, seen tons of tutorials, and just had to try it. Like the headband, I made this in a fit of craftiness at midnight before our big Ladies Conference. It took me no time at all. Literally about 10 minutes max.

So let's get started! What you'll need:
Old t-shirts (as many as you want), a large plate (or something round) and scissors. Yep, that's all! I used a 10" dinner plate. How wide the circumference is will determine how long your scarf strands are.
Start with your first shirt, and cut it off right under the arms.
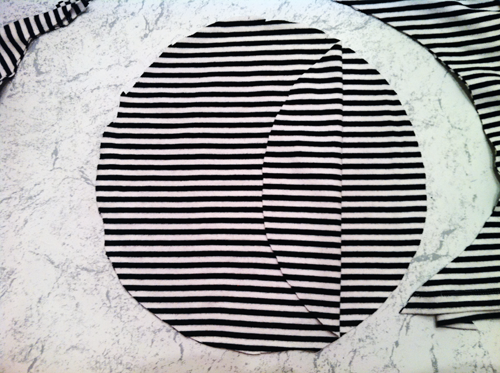
Use your plate as a guide to cut a circle out of the fabric. Leave the shirt intact so you can cut two pieces at one time.
Like so. Continue doing this until there is no more fabric. I was able to get 4 full circles out of my shirt (it was a 2XL) but ended up only using two. Each of these circles will become a strand in your scarf, so mix and match colors and use as many strands/circles as you want.
Start at one edge of the circle and begin cutting in a spiral. I made my strands about 2 inches wide.
Continue cutting until you have a cute fabric snake sitting on your table. :) At this point I left the center as a circle, but later went back and cut it to match the beginning of the strand.
Take each strand and stretch them out. Because they are cotton, they'll start curling into themselves and form a fun loopy swirl! A tip: This shirt I used happened to be stretchy, probably with something other than cotton in the material. It didn't want to curl too much, and ended up not swirling as much as the white pieces, which were used from a plain white t-shirt. Be sure to use cotton t-shirts for the best results.

Continue this process with your remaining shirts until you have the desired amount of strands. The fun thing about this scarf is that the possibilites are endless. You can mix and match colors, make some strands thick or some thin, and make just a few strands or a whole bunch of strands.
Once you have all the pieces you want, put them together and tie knots in them, or add your own embellishments! I've seen so many variations on these.

I've seen ones with pom-pom strands mixed in with the t-shirts, or fabric flowers clipped on. If you wanted to be really funky, you could use a smaller plate, and piece the ends together of different colors for a fun effect. Just knot two ends together until you reach the desired scarf length!
So there you go. A fun, swirly girly t-shirt scarf that takes less than 10 minutes to throw together. Looking at these pics, I think I'll go back and add a few black strands to mine to make it thicker. The more the better!

-Jenn (With 2 N's)

11.16.2011

Pearly White Headband Tutorial

It's been so long since I've made any hair pretties, that I'm, just beside myself to be able to share this with you! Life has been pretty hectic lately, and crafting has definitely been put on the back burner. If you could see my craft table, you'd probably faint from sheer horror.

It's no secret that I'm in love with Pinterest, so when I saw this Anthropologie inspired headband, I knew I had to make it. I pinned it about 2 months ago, bought the supplies about 2 weeks ago, and just this weekend got the chance to sit down and actually make it.
As I posted last week, this last weekend I was at our annual Ladies Conference. Friday morning was the first session, and after packing everything I needed Thursday night, I got the urge to create this headband so I could wear it the next day. It was literally 11:30 at night, and I was sitting at the dining room table hot gluing pearls to felt. It felt so good too. :)

So let's get to it! Things you'll need:
A headband, felt, pearls or beads, scissors and a hot glue gun.

I found these pre-strung pearls at Michaels, and opted for a plastic headband with teeth, since it seems to stick better on my head. I also found this awesome stiffened felt at Michaels. I was a goober and had it turned over in the picture, but the opposite side was slightly glittery. You won't see it once the pearls are on, but glitter never hurt anyone.

Measure out how many pearls you want. Mine were right at about 10" long, or approximately 55 pearls. I wanted smallish circles so I could put three on the headband.
Start by gluing down the first bead, on the knotted end. As I was doing this, I was holding the other end with my fingers so the pearls wouldn't fall off. If you decide to string them yourself, you can knot both ends. This would of course be easier, but I like to wait till midnight to do things. :)

Apply a generous portion of hot glue (don't skimp) and start gluing the pearls in a spiral.
You don't want glue seeping in between the pearls, but be sure to get enough glue or they won't stick to the felt. As you can see, I opted to do white pearls on white felt, but I also wanted my circles to be tight, so I made sure to push the pearls together on the strand and glue them close together.

Be sure when you start your circle that you will have plenty of space on the felt to complete it.
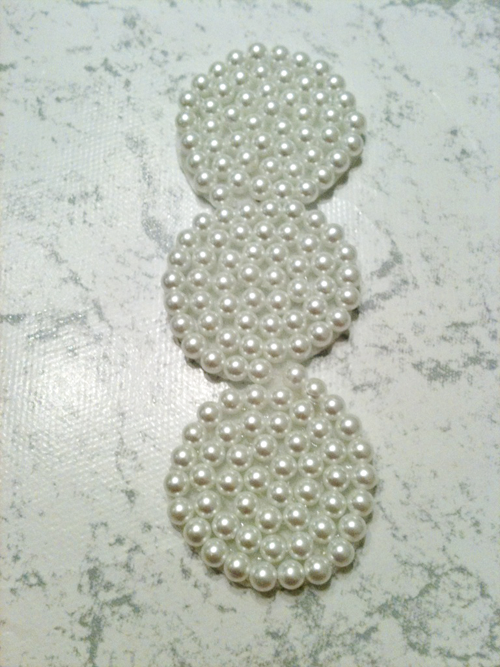
Repeat until you have the desired amount of circles. Even though the last pearl isn't knotted, the glue will keep it securely on the felt.
Cut out the circles, being sure to not leave felt on the edges, and space them together. I decided to make mine look like it was a continuous spiral. But really, you won't be able to tell when you get it on.
These tend to be heavy, so use plenty of glue when putting them on the headband. Normally when I get to this step I would glue an extra backing on the inside of the headband, but I wanted to preserve the gripper teeth, and they were sturdy enough because I used the stiff felt.
 And there you have it! An easy, pearly headband that will take you less than 30 minutes to make.
I got tons of compliments on this. It's probably my favorite headband I've made. The options for colors are endless, and it goes with anything. You could add a cute embellishment to the center, or use colored felt underneath. I picked up some black glittery pearls and gray felt to make one for my sister.

Tomorrow: Swirly Girly Scarf Tutorial

-Jenn (With 2 N's)


8.22.2011

A Blessed Birthday Weekend

Can I just say how blessed I am? As much as I hate to admit it, I have a tendency to forget that and feel sorry for myself on many occasions. BUT, I have amazing friends and family, and with their help I had a wonderful birthday weekend.


Friday afternoon I had a late lunch with my best girlfriend at my favorite Chinese fast food joint, and afterwards we found this cute pastry shop. It was a brand new business, and we had fun trying out what they had to offer!


We both tried the strawberry cupcake with fresh strawberries baked into the cupcake, and topped with a delicious cream cheese icing.


It was pretty yummy. :)


After lunch I went to her house, where she (bless her) helped me sew together my circle garland for the dinner party I was having that evening. She's a dear, because it took a little longer than we had expected. BUT, we got it done! (Check back later in the week for a short tutorial.)


After we finally got the garland done, I rushed home to get the dining room decorated for dinner with Bestie #2, and it turned out just like I wanted! Simple, but fun.


On the way home I stopped and bought a bouquet of fresh flowers for my vases. The colors worked perfectly with my decor, and the entire bouquet was only $7!


I was really happy with how the whole thing came together at the last minute. The day before (Thursday) I had gone to Hobby Lobby with all my girlfriends *wink* and purchased my "place mats" and had them laminated.

I also snagged the two smaller vases (yellow & purple) to go with the two larger ones I already had, as well as the adorable straws. I just love those straws. I think I'm going to use them all the time now. They are made of plastic, so they are completely re-usable!


The place mats worked great and I loved them. I also picked up the mason jars, used as cups, from a dear friend who still has 5 dozen left in his garage. (Anyone need cups??)

And see those gorgeous green bowls? Those are my first Anthropologie purchase ever. I went with the bestie last summer and they had these half price. I just couldn't pass them up! And now I wish I'd gotten 6 instead of 4.


And here's the garland! It looked super cute in our huge window. However, there were some complications with it. But that can be saved for later. =)


Father fixed some ah-mazing steaks (on my request) and we had fresh salad and baked potato to go along. It was deeeee-licious!


And to top it all of, my phenomenally talented friend Dustin, from The Frosted Bowl made me this adorable cake!! He even made sure to put the 2nd N in my name. (See how he accented it? I just loved it!) My silly mother wanted me to have a candle to "blow out" so she stuck this one on there. She's a mess!


So see...I'm a blessed bird! (As my bestest friend would say.) Friday night was so much fun with my bestie and her hubby and baby. We talked, laughed, shared funny stories and jokes, attempted to play a game, and just had a wonderful time together.

I can't wait to see what this next year has to offer. I'm ready, so bring it on!!

-Jenn (With 2 N's)

8.18.2011

Summer Time. Party Time. Any time.

This weekend my very best friend and her husband are coming to dinner for my birthday! I had all these grand plans of having all of my closest friends over, and I was so sad that half of them already had plans. BUT, I get to have celebratory lunch with Bestie#1 on Friday, and celebratory dinner with Bestie#2 that evening! Jesus blessed me with some spectacular friends.

I normally don't go all out for dinner parties, but I wanted to make this one special. It will be the first time Bestie#2 has been to my house with her newest addition, Sir Andrew! So I wanted to make it extra special.

I've been searching Pinterest and the internet for easy DIY ideas for decorating, and I love all the ideas I've found!


I had the idea to use a piece of laminated scrapbook paper as placemats, and I really like this idea from Martha herself. Simply cut a V into the corner of your placemat to make a cute pop-up name tag!


I've been seeing these adorable garlands and mobiles made of circles. In our dining room we have a beautiful full length window, so I'm planning on making these to hang there. I can't wait to see the effect with the sun shining through the window!


I just love the feeling of this set-up. I planned on having flowers on the table, in some bright, colorful vases I've been saving.


This is my perfect color palette. I love vibrant, bright colors, and these will be what I decorate with.


I really like the look of mason jars as cups, and have access to the jars with handles on them, which I love. I also really like the cute, striped straws that have been cropping up everywhere lately. I plan on getting some to match the color theme!

I can't wait to show you guys how it all turns out!!

-Jenn (With 2 N's)


7.22.2011

Where has the morning gone?

It's Friday! I was hoping I wouldn't get to this point with only one blog under my belt for the week, but alas, that is what has happened.

It's been a busy sort of week. But, the weekend is upon us, and I'm looking forward to it!


I have had lots of interest in my new hand braided headbands, so I will be hitting the thrift stores this weekend to find some t-shirts! And I've had a hankering to do some new projects that do not involve hair accessories (I know....I'm obsessed), so I'm going to see if any of the local craft stores have some good deals on scrap material.

I've found some wonderful inspiration over on Pinterest for some new crafts, and I can't wait to try them all!

Awhile back I purchased some large and small canvas tote bags from Hobby Lobby that were 1/2 price. I've been itching to do something with them, and I've found tons of ideas this week.

I've seen this done before, and just love the effect the painted doily gives. The tutorial looks super easy, and would be very inexpensive!

This bag just spoke to me. :) I love how it's not perfect. And the patterns are all totally different but they blend so nicely. I don't own a sewing machine, and frankly, sewing machines and I don't usually get along, so I would hand-sew my tote, which I think would give it a nice effect.


If you know me, I mean, REALLY know me, you know I kind of love flip-flops. I have more of them in my closet than regular shoes. I just love them!

So when I found these DIY flip-flops, I feel madly in love. I ADORE these zebra ruffled flippies. The tutorial is in-depth, and requires a sewing machine, so I've been contemplating how to create these sturdy enough by hand sewing them. Ideas??


These, on the other hand, would be MUCH easier to create. And I also love the way they look! I actually used this tutorial and created some flippies, but I used braided cotton (similar to the headbands.) Unfortunately, they didn't turn out so fabulous. So I am going to rip out the fabric and do it over.

So that's what's been going on! Lots of brainstorming and contemplating. Hopefully this next week I'll be able to get back to my craft table and have some stuff to show you!

Have a wonderfully FABULOUS weekend!

-Jenn (With 2 N's)